Meguiar’s G3000 Heavy-Duty Headlight Restoration Kit
Why do you need the Best Headlight Restoration Kit?
 If your headlights are worn out and foggy, chances are you need to either get new ones or use the best headlight restoration kit to make them look brand new. The plastic lens around your headlights can become dirty and damaged over time due to aging, UV light damage, dirt on the road, inclement weather, or just normal wear and tear.
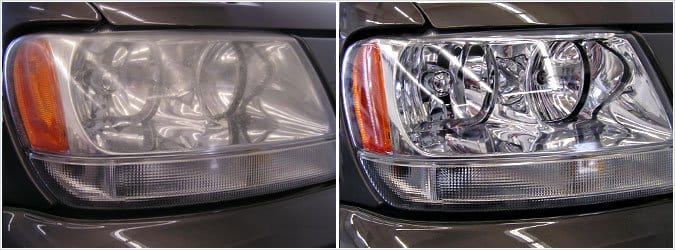
This leads to fog on your headlights that takes more than just a wipe with soap and water to get out. Having foggy headlights not only makes your car look old but also is terrible for light output. There are generally two ways to restore the clarity of the plastic around your headlights. The first is the more expensive route and it is simply to replace it with a brand new plastic cover.
The second method is probably the one you are interested in and involves a bit of work but is a much cheaper option. It requires you to buy a headlight restoration kit and get down and dirty and scrub your headlights for a few minutes. These kits are designed to be used for not just headlights, but also taillights, fog lights, and directional lights. They are specifically designed to eliminate the foggy, cloudy look of headlights. It usually involves sanding down the lens, removing surface-level scratches, and finally polishing it off and applying a layer of sealant. For more information, we have put together a buying guide below.
Best Headlight Restoration Kit Reviews
- Meguiar’s G3000 Heavy Duty Headlight Restoration Kit (Top Pick)
- 3M 39008 Headlight Lens Restoration System
- Mothers 08808 PowerPlastic 4Lights
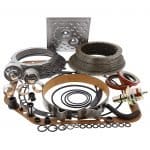
1. Meguiar’s G3000 Heavy-Duty Headlight Restoration Kit
If you are looking for the best headlight restoration kit, the Meguiar’s G2000 kit is by far the best heavy-duty kit out there. Out of all of the restoration kits we have tested, this one seems to work the best at removing serious fog and yellowing on your headlight lens. The kit is loaded with all sorts of goodies. You get a sanding pad, sand discs of varying grit levels, a bottle of clear plastic cleaner, a bottle of protectant, a drill-operated wool pad, and a microfiber towel.
The process is a bit more complicated than your normal restoration kits in that it has three steps. First, you use the 1000-grit sandpaper to eliminate severe oxidation and then the 3000-grit sandpaper to refine the surface. The sandpaper attaches to the provided sand pad, which is nice and easy to hold onto. After the sanding process, your headlight lens should be about 50% clear already. The next step is using the drill-operated buff wool pad with a bit of the PlasticX gel. This cleaner serves to remove clouding, and sand marks, and restore clarity. The PlastX is basically an advanced soap that further removes light oxidation, chemical degradation, and surface contamination.
So after you have loosened everything with the sandpaper, a healthy wipe with the wool pad and PlastX should turn any lens totally clear. Don’t worry if you don’t have a cordless drill – just use your hands. Once the headlight lens is totally clear, it is time to protect it with the headlight protectant. Using the wool pad or the microfiber towel, spread a healthy layer of Meguiar’s protectant to prevent future damage to the headlights and prevent oxidation for about one year. We would estimate this kit has about 5 or 6 uses.
2. 3M 39008 Headlight Lens Restoration System
 If you want the best headlight restoration kit, the 3M restoration system is certainly a very popular option. This kit is fairly cheap and is a much better option than replacing an entire headlight lens. The kit contains masking tape for protecting the work area, a series of sanding disks calibrated by grit levels, and a wax protectant.
Sure you can probably buy all of these items separately, but it will end up costing you more than if you just paid for the kit. The sandpapers slap onto an included sand pad and can be changed out easily and reused. There are about 10 sandpapers all with varying grit levels. We recommend you start with the lowest-numbered grit paper first and work your way up.
The sandpaper pad also has an attachment so you can hook it up to an electric sander or drill so that you can give your arms a break. We find the 3M sand papers to be very effective at removing yellowing and gunk on the lens of your headlights. On average it took 3 different sandpapers of varying strengths to fully remove all of the fog and gunk. After achieving maximum clarity, this kit includes a synthetic wax protectant so that your lens can be protected in the future. You can use the included sponge to apply a thin layer of this coating.
3. Mothers 08808 PowerPlastic 4Lights
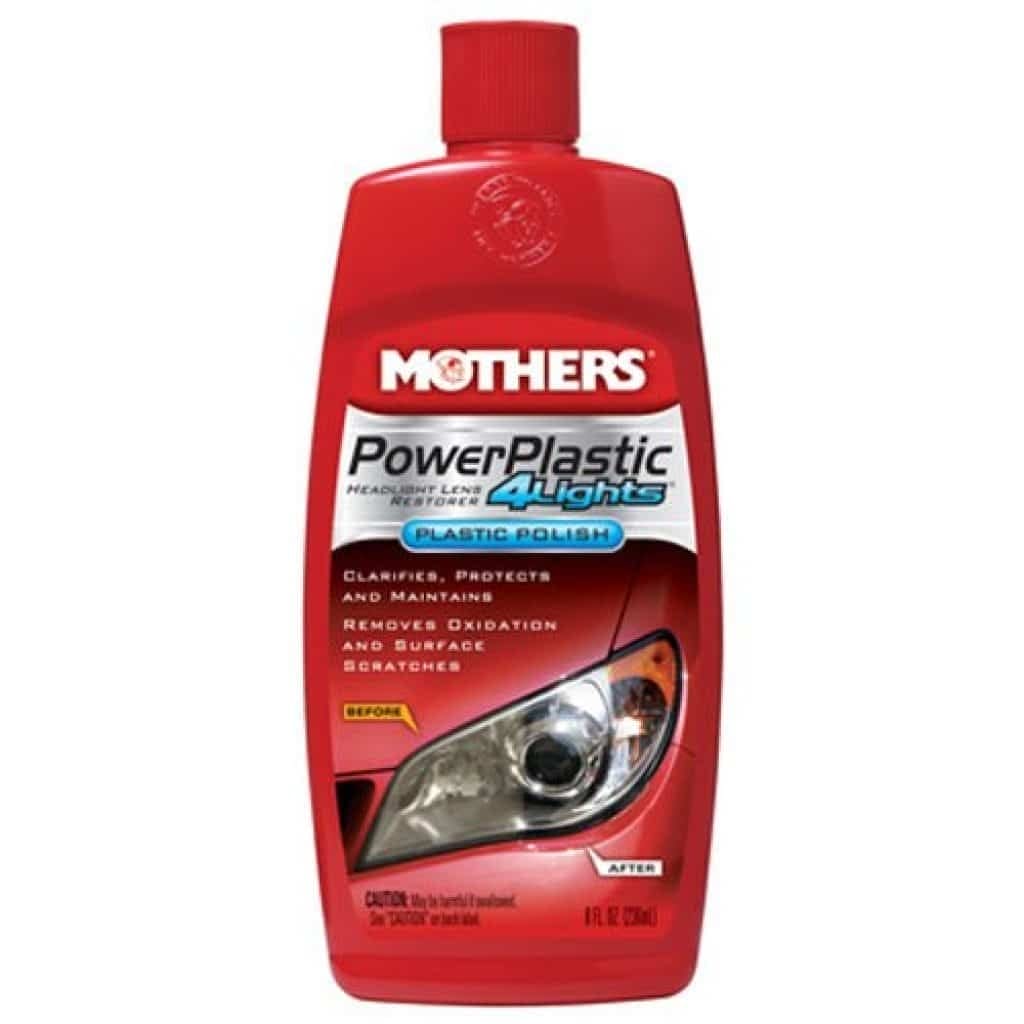 If you are lazy and have moderate to low levels of fogging and oxidation on your headlights, Mother PowerPlastic is the best headlight restoration kit for you. This isn’t really a kit and really is just a bottle of solution that allows you to restore your headlight lens in one step. You simply wipe this solution on a wool pad or a microfiber towel and wipe thoroughly.
The PowerPlastic should do all the work for you, completely eliminating the need to get down and dirty with sandpaper and grind it out. We recommend you use a cordless drill and a wool pad to make your life much easier. The wool pad or applicator pad doesn’t come with this bottle so you would have to buy it separately from Mother. We find that for moderate-level fogging, the Mothers PowerPlastic works perfectly.
It is specially formulated with polymers to inhibit oxidation, remove gunk, and protect your headlights from UV rays. This 8 oz bottle lasts a long time and can be used perhaps 100 times. The key is to use this solution more often so that your headlights never build up to the point where you have to use a heavy-duty headlight restoration kit to deal with the issue. Best of all, the PowerPlastic is super cheap and is great for those on a budget.
Best Headlight Restoration Kit Buying Guide
 The best headlight restoration kit will restore a foggy lens to clear while standard cleaners and soap won’t be able to remove this. Your headlights or HID lights can turn yellowish and foggy for several reasons. First of all, the polycarbonate lens builds up oxidation when exposed to the air and develops cracks when exposed to UV light for long periods of time.
Additionally, small rocks, dirt, and debris can also pick up on the road and randomly make small dents and pits on your lens. Also, the longer your headlights stay on the road, the more they will develop a layer of dirt and chemicals. These layers end up hardening if you don’t frequently clean them.
Finally, you have water vapor that is created inside the headlight because there is a lot of moisture in the trapped air. This water vapor will scatter and diffuse light coming from your headlights. As you can see, the solution is not just to wipe off your headlights with water and soap. Some of the fog and dirt associated with the fog on your headlights have already oxidized and hardened, making it extremely difficult to just remove with water and soap. If you are seriously interested in removing the gunk on your headlights, you need to use a headlight restoration kit. We have highlighted some things to consider before buying one.
Sandpaper
In every headlight restoration kit is sandpaper. There is a lot of hardened oxidation on your lens that you need to sand off to make your headlights clear. Most kits will come with sandpaper of multiple grits. Sandpaper with a low grit count means it is very coarse and has a high particle diameter. Conversely, sandpaper with a high grit count is extra fine and has a very low particle diameter. In general, you should be using a heavy grit sandpaper first and then work your way down to a sandpaper with a finer grit.
Usually, Emery sandpaper will be provided with your restoration kit. These papers come in round disks and can be attached to electric sanders. They also have grit count labeled so you know exactly what you are dealing with. When sanding, you can either use your hands or use an electric sander. We think you have more control over your hands and can apply more pressure, but the trade-off is that it will wear you out very easily.
Sealant
Most headlight restoration kits also come with a sealant, so that you can protect your headlights from rapid degradation in the future. Sealants should be applied after you sand, rinse, and dry the lens. Most sealants are oil-based polymer coating in the form of wax, which basically creates a smooth waxy surface so that things don’t stick to it in the future.
This coating should be great at blocking ultraviolet radiation and preventing oxidation from yellowing your lens. Of course, the protectant won’t be 100% effective, and eventually, your headlights will turn yellow and foggy. However, with the right protective coating, you can greatly extend the time in which occurs.
References
https://en.wikipedia.org/wiki/Plastic_headlight_restoration
https://www.cars.com/articles/2013/12/how-to-restore-your-vehicles-headlights/